A Comprehensive Comparison to Help You Choose the Right Headless CMS
Choosing the right headless CMS for your project can be challenging. With so many options available, it's important to understand the differences between solutions like ElmapiCMS and Strapi. This guide will help you compare these two popular headless CMS platforms, focusing on what matters most: ease of setup, simplicity, performance, scalability, and developer experience.
By the end of this article, you'll have a clear understanding of which CMS better fits your needs, along with practical examples showing how to get started with each platform.
Table of Contents
- Understanding the Basics
- Installation and Setup
- Ease of Use and Learning Curve
- Performance and Resource Usage
- Content Management Features
- Pricing and Licensing
- Use Cases: When to Choose Each
- Getting Started with ElmapiCMS
- Getting Started with Strapi
- Conclusion
Understanding the Basics
Before diving into the comparison, let's understand what each CMS offers.
What is ElmapiCMS?
ElmapiCMS is a self-hosted headless CMS built with Laravel and React. It's designed to be simple, fast, and focused on structured content management. ElmapiCMS emphasizes:
- Minimal setup complexity
- Clean, intuitive admin interface
- Fast performance out of the box
- Full control over your data and infrastructure
- Multi-project support from a single installation
- One-time purchase model (no recurring fees)
What is Strapi?
Strapi is an open-source headless CMS built with Node.js. It's one of the most popular headless CMS solutions, known for:
- Extensive plugin ecosystem
- Highly customizable architecture
- Large community and documentation
- Free open-source version with optional cloud hosting
- Enterprise features in paid plans
Both are self-hosted solutions that give you full control over your content and infrastructure, but they approach content management differently.
Installation and Setup
The installation process is often the first hurdle you'll encounter. Let's compare how easy it is to get each CMS running.
ElmapiCMS Installation
ElmapiCMS offers straightforward installation options:
Using Docker (Recommended):
# Extract the project
cd ~/projects/Elmapi3

# Install dependencies
composer install

# Copy environment file
cp .env.example .env
php artisan key:generate

# Install Laravel Sail
php artisan sail:install

# Start the application
./vendor/bin/sail up

# Run migrations
./vendor/bin/sail artisan migrate --seed
Using Laravel Herd (macOS/Windows):
# Navigate to Herd directory
cd ~/Herd/Elmapi3

# Install dependencies
composer install

# Setup environment
cp .env.example .env
php artisan key:generate

# Run migrations
php artisan migrate --seed
ElmapiCMS can be up and running in about 5-10 minutes, depending on your environment. The installation process is well-documented and doesn't require extensive configuration.
Strapi Installation
Strapi installation involves:
# Create new Strapi project
npx create-strapi-app@latest my-project

# Choose installation type (Quickstart or Custom)
# Quickstart uses SQLite
# Custom allows you to choose database

# Start development server
npm run develop
Strapi's installation is also straightforward, but the initial setup wizard requires more decisions (database choice, installation type). The Quickstart option is fastest, but you may need to reconfigure later for production.
Comparison:
- ElmapiCMS: Simpler initial setup, fewer configuration choices
- Strapi: More options during setup, but may require more decisions upfront
For projects where you want to get started quickly, ElmapiCMS has a slight edge in simplicity.
Ease of Use and Learning Curve
Admin Interface
ElmapiCMS Interface:
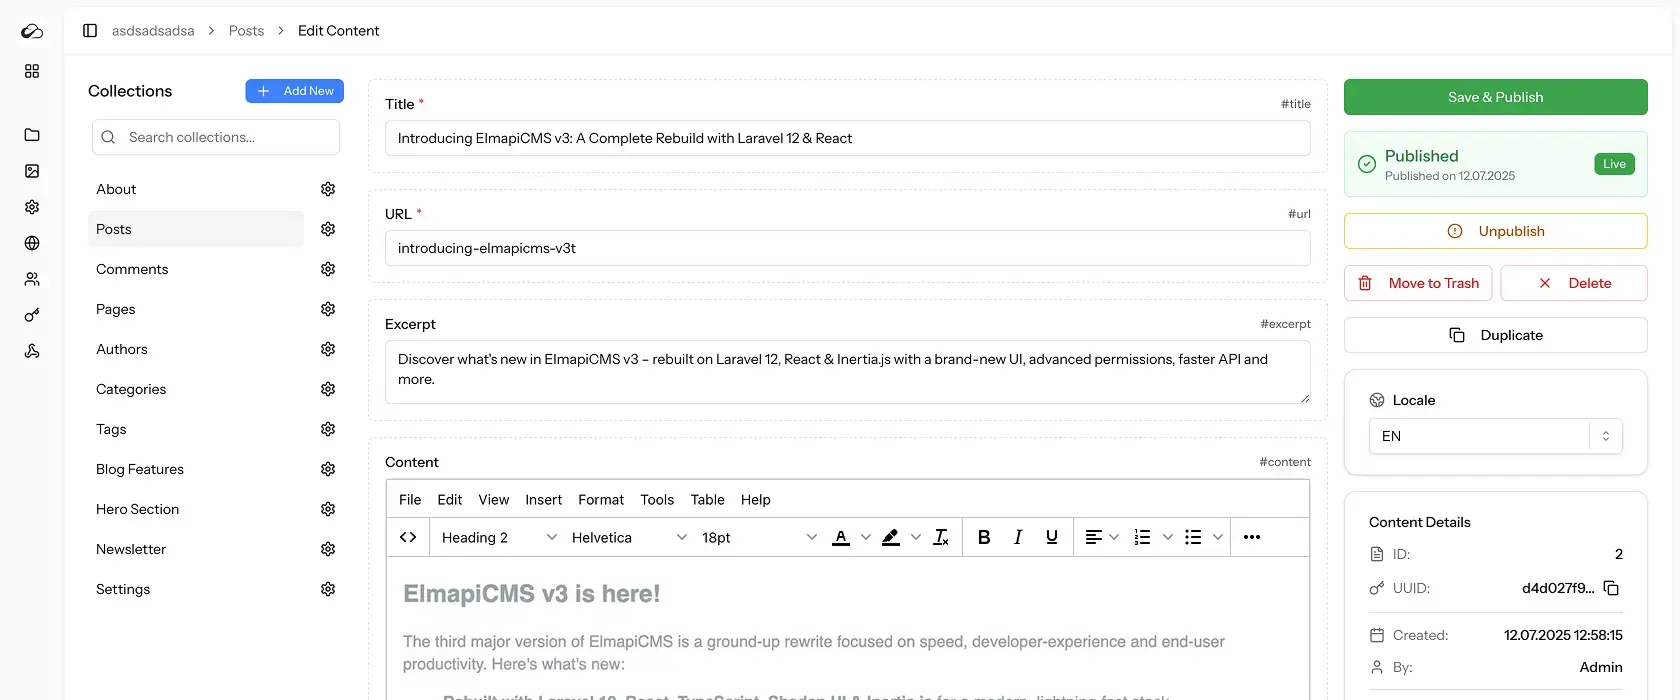
The ElmapiCMS admin panel is built with React and Inertia.js, providing a clean, fast single-page application experience. The interface focuses on:
- Simple collection and field management
- Visual field builder with drag-and-drop
- Minimal clutter, focused on content management
- Fast navigation between collections and entries
Strapi Interface:
Strapi's admin panel is also React-based and feature-rich. It includes:
- Comprehensive content type builder
- Plugin management interface
- Settings and configuration panels
- More features visible at once
Learning Curve:
ElmapiCMS is designed to be approachable for both developers and non-developers. The interface is intentionally minimal, making it easier to learn. Strapi's interface is more feature-rich, which can be overwhelming for beginners but powerful for advanced users.
Content Modeling
ElmapiCMS Content Modeling:
Creating a collection in ElmapiCMS is straightforward:
- Click "Add New" in the Collections sidebar
- Name your collection
- Choose a template (optional) or start from scratch
- Add fields using the visual field builder
- Start adding content
Example: Creating a Blog Collection
// ElmapiCMS automatically generates the API
// No code required for basic setup

// API endpoint becomes available at:
// GET /api/posts
Strapi Content Modeling:
In Strapi, you use the Content-Type Builder:
- Navigate to Content-Type Builder
- Create a new collection type
- Add fields through the interface
- Configure field settings
- Save and restart the server (in development)
Example: Creating a Blog Collection in Strapi
// Strapi requires server restart after schema changes in development
// API is auto-generated but requires restart

// API endpoint:
// GET /api/posts
Comparison:
- ElmapiCMS: Simpler content modeling, no server restarts needed
- Strapi: More configuration options, requires restarts for schema changes
ElmapiCMS's simpler approach reduces friction during development, making it efficient for projects of any size.
Performance and Resource Usage
Performance matters for projects of all sizes, whether you're running on limited resources or scaling to handle high traffic.
Resource Requirements
ElmapiCMS:
- PHP 8.2+ required
- MySQL, PostgreSQL, or SQLite for database
- Composer for PHP dependencies
- Node.js only needed for frontend development (admin panel)
- Lightweight runtime, efficient caching
Strapi:
- Node.js 18+ required
- MySQL, PostgreSQL, SQLite, or MongoDB for database
- npm/yarn for package management
- Node.js runtime for both admin and API
API Performance
ElmapiCMS API:
# Simple, fast API responses
curl https://your-cms.com/api/posts

# Response structure:
{
  "data": [
    {
      "uuid": "...",
      "fields": {
        "title": "Post Title",
        "content": "..."
      }
    }
  ]
}
ElmapiCMS uses Laravel's efficient query builder and caching mechanisms, resulting in fast API responses even with complex queries.
Strapi API:
# Strapi API with similar structure
curl https://your-cms.com/api/posts

# Response includes metadata:
{
  "data": [...],
  "meta": {
    "pagination": {...}
  }
}
Strapi's API is also performant, but the Node.js runtime can consume more memory, especially with multiple concurrent requests.
Comparison:
- ElmapiCMS: Lower memory footprint, efficient PHP runtime, scales well with Laravel's proven architecture
- Strapi: More memory usage typical of Node.js applications
ElmapiCMS's efficient resource usage makes it suitable for projects running on limited hosting, while also scaling effectively for larger applications.
Content Management Features
Core Features Comparison
Content Types:
- ElmapiCMS: Collections with flexible field types (text, rich text, media, number, date, toggle, relation, etc.)
- Strapi: Content types with similar field types plus components and dynamic zones
Multi-Project Support:
- ElmapiCMS: Built-in multi-project feature allowing you to manage multiple content projects from a single installation. Each project has its own collections, API endpoints, and user permissions. This is ideal for agencies managing multiple client projects, developers working on several applications, or organizations needing separate content spaces.
- Strapi: Single project per installation. To manage multiple projects, you need separate Strapi instances, which means multiple installations, databases, and server resources.
Media Management:
- ElmapiCMS: Built-in asset library with local or cloud storage options
- Strapi: Media library with similar capabilities, plus image optimization plugins
User Management:
- ElmapiCMS: Project-based user roles and permissions, allowing different access levels per project
- Strapi: Role-based access control (RBAC) with more granular permissions
Internationalization:
- ElmapiCMS: Built-in multi-language support per collection
- Strapi: i18n plugin available (may require additional setup)
Versioning and Drafts:
- ElmapiCMS: Published/draft status, simple versioning
- Strapi: Advanced versioning and draft system
Extensibility
ElmapiCMS:
ElmapiCMS is built on Laravel, allowing you to:
// Extend functionality with Laravel packages
// Custom API endpoints
// Webhooks for integrations
// Custom validation rules
Strapi:
Strapi offers extensive plugin system:
// Install plugins from npm
npm install @strapi/plugin-seo

// Custom plugins
// Middleware customization
// Lifecycle hooks
Comparison:
- ElmapiCMS: Simpler, focused feature set with powerful multi-project capabilities. The multi-project feature is a significant advantage for agencies, developers managing multiple clients, or organizations needing separate content spaces without additional infrastructure.
- Strapi: More features and extensibility, but requires separate installations for multiple projects
ElmapiCMS's focused approach reduces complexity while providing all essential features, and its multi-project support makes it particularly valuable for managing multiple projects efficiently.
Pricing and Licensing
ElmapiCMS Pricing
ElmapiCMS uses a one-time purchase model:
- Single License: $149 one-time purchase
- No recurring fees for self-hosted version
- Full source code access
- Free updates (version 3.x)
- No usage limits
This model is ideal for projects of all sizes with budget constraints, as you pay once ($149) and own the software. The multi-project feature means you can manage unlimited projects with a single license, making it extremely cost-effective for agencies and developers managing multiple clients.
Strapi Pricing
Strapi offers multiple tiers:
- Community Edition: Free and open-source
- Cloud: Paid hosting with usage-based pricing
- Enterprise: Advanced features and support
The Community Edition is free, but you'll need to self-host. Cloud hosting adds recurring costs, and Enterprise features require a subscription.
Comparison:
- ElmapiCMS: One-time purchase, predictable cost, unlimited projects per license
- Strapi: Free open-source version, but cloud/enterprise features cost more, and each project requires a separate installation
ElmapiCMS's one-time fee can be more cost-effective long-term, especially when managing multiple projects. With Strapi, you'd need separate installations for each project, increasing infrastructure and maintenance costs.
Use Cases: When to Choose Each
Choose ElmapiCMS When:
- You want simple, focused content management
- You prefer minimal setup and configuration
- You need fast performance and efficient resource usage
- You want a one-time purchase model
- You're managing multiple projects from a single installation
- You prefer Laravel/PHP ecosystem
- You want quick deployment without extensive customization
- You're an agency or developer managing multiple client projects
- You need scalable solutions that work for both small and large projects
Ideal for:
- Personal blogs and portfolios
- Small to large business websites
- Client projects (especially when managing multiple clients)
- Agencies managing multiple projects
- Projects needing quick setup and deployment
- Organizations requiring separate content spaces per department or brand
Choose Strapi When:
- You need extensive customization and plugins
- You want a large community and ecosystem
- You need advanced features like complex relations
- You prefer Node.js ecosystem
- You're building enterprise applications
- You need cloud hosting options
- You want maximum flexibility
Ideal for:
- Complex applications with many content types
- Projects requiring extensive plugin ecosystem
- Enterprise applications with advanced requirements
- Teams familiar with Node.js
Getting Started with ElmapiCMS
Let's walk through setting up a simple blog with ElmapiCMS to see how it works in practice.
Step 1: Install ElmapiCMS
Follow the installation guide for your platform. Using Docker:
cd ~/projects/Elmapi3
composer install
cp .env.example .env
php artisan key:generate
php artisan sail:install
./vendor/bin/sail up
./vendor/bin/sail artisan migrate --seed
Step 2: Create a Project
- Login to your ElmapiCMS instance (default: [email protected] / password)
- Click "Create Project"
- Name it "My Blog"
- Click "Create Project"
Note: With ElmapiCMS's multi-project feature, you can create additional projects later. Each project operates independently with its own collections, API endpoints, and permissions. This makes it perfect for managing multiple websites, client projects, or separate content spaces from a single installation.
Step 3: Create a Blog Collection
- In your project, click "+ Add New" in Collections
- Name it "Posts"
- Choose "Blog Post" template
- Click "Create Collection"
This creates a collection with title, slug, and content fields. You can add more fields like excerpt, featured image, or category as needed.
Step 4: Add Content
- Click on "Posts" collection
- Click "+ Create New"
- Fill in your blog post details
- Click "Save & Publish"
Step 5: Access the API
Your content is now available via API:
// Get API credentials from API Access section
const client = createClient(
  'http://localhost:8000/api',
  'your-api-key',
  'your-project-id'
);

// Fetch posts
const posts = await client.getEntries('posts');
console.log(posts);
Step 6: Connect to Frontend
Use the ElmapiCMS JavaScript SDK in your Next.js, React, or Vue application:
// lib/elmapicms.ts
import { createClient } from '@elmapicms/js-sdk';

export const client = createClient(
  process.env.ELMAPI_API_URL!,
  process.env.ELMAPI_API_KEY!,
  process.env.ELMAPI_PROJECT_ID!
);

export async function getPosts() {
  return await client.getEntries('posts');
}
That's it! You have a working headless CMS in minutes. For a complete tutorial, check out our guide on building a blog with ElmapiCMS and Next.js.
Getting Started with Strapi
For comparison, here's how to set up the same blog with Strapi.
Step 1: Install Strapi
npx create-strapi-app@latest my-blog
# Choose Quickstart (SQLite) for fastest setup
cd my-blog
npm run develop
Step 2: Create Admin User
- Open http://localhost:1337/admin
- Complete the admin registration form
- Login to the admin panel
Step 3: Create Content Type
- Go to Content-Type Builder
- Click "Create new collection type"
- Name it "Post"
- Add fields:
- Text field: "title"
- Text field: "slug" (unique)
- Rich text field: "content"
- Click "Save" and restart the server
Step 4: Configure Permissions
- Go to Settings > Users & Permissions > Roles > Public
- Enable "find" and "findOne" for Post
- Save
Step 5: Add Content
- Go to Content Manager > Post
- Click "Create new entry"
- Fill in your post details
- Click "Save" and "Publish"
Step 6: Access the API
// Fetch posts
const response = await fetch('http://localhost:1337/api/posts');
const { data } = await response.json();
console.log(data);
Both CMSs get you to a working API quickly, but ElmapiCMS requires fewer steps and no server restarts during development.
Conclusion
Both ElmapiCMS and Strapi are excellent headless CMS solutions, but they serve different needs.
ElmapiCMS offers:
- Simpler setup and configuration
- Faster learning curve
- Lower resource requirements with efficient performance
- One-time purchase model with unlimited projects per license
- Multi-project support from a single installation (major advantage for agencies and developers)
- Focused feature set without bloat
- Quick deployment without extensive customization
- Scales effectively from small to large projects
Strapi excels when you need:
- Extensive plugin ecosystem
- Advanced customization options
- Large community support
- Enterprise-grade features
- Maximum flexibility
- Single project per installation is acceptable
The multi-project feature is a significant differentiator for ElmapiCMS. If you're managing multiple websites, client projects, or need separate content spaces, ElmapiCMS allows you to do this from a single installation with one license. With Strapi, you'd need separate installations for each project, increasing infrastructure costs and maintenance overhead.
If you want to get started quickly with minimal complexity while having the flexibility to scale and manage multiple projects, ElmapiCMS is an excellent choice. Its focused approach means less time configuring and more time building your application, whether you're working on a single project or managing dozens.
The best way to decide is to try both. Start with ElmapiCMS for your next project and experience its simplicity and multi-project capabilities firsthand. You can always migrate to a more complex solution later if your needs grow, but you might find that ElmapiCMS handles everything you need, from small personal projects to large multi-client agency setups.
Ready to get started? Check out our demo, installation guide and getting started tutorial to begin building with ElmapiCMS today.
Related: What is ElmapiCMS?
Related: Getting Started with ElmapiCMS
Related: How to Build a Simple Blog Using ElmapiCMS and Next.js